
Heavy work first
We started with the heavy work, which is the rear axle, the stock 7.5 inch has to make room for the beafier 8.8 inch rear axle as found in all GT’s and GT500’s. the gearing will be 3.55:1.
Suspension and traction
 While we are there, we decided to install a cortex wattslinks instead of the panhardbar system, so the axle will stay planted on the pavement, even on uneven surfaces in tight or highspeed corners, and the owner is able to handle twisty roads in the alps without having to think if his suspension keep up to the task.
To further improve traction and avoid wheelhop, a set of lower control arms will are installed as well. The rest of the handling items will be as supplied by Shelby, which in fact is the Eibach pro system springs and shocks, plus a swaybar set.
Gauges and sensors
The install of the supercharger is actually a straight forward job, but it would have been great if all hoselocks and fittings were included since a few were missing. Fresh oil & coolant are added and sparkplugs gapped at 0.35″, to make sure everything is fresh we changed the automatic transmission oil and fuel filter as well. The engine fired up immediately and ran great from the beginning, exactly as it should be. The hardest job is the gauges and sensors, to mount them in such a way the wiring looks like it is OEM installed and to get the wiring through the top of the dashboard, but it’s rewarding, they look awesome and the large analog displays are easy to read from the drivers position.
Bumpers & spoilers
Back to the exterior again, knowing the fit and finish is not always as we expect it to be in Europe, let’s hope for the best with the bumpers and hood. First we take of the rear bumper and the V6 rear spoiler, and we clean up the trunklid so it can be painted, the sirius satelite receiver is being discarded and the existing hole will be welded so it it won’t interfere with the later to be applied striping. The rear bumper is a oem Ford GT500 bumper, so that fit’s like a glove just like the GT rearspoiler. On the trunklid the S H E L B Y letters are lined out, holes drilled and test fitted to see if they all line up correctly. Now the rear bumper is in place and test fitted, it’s time to install the supplied exit exhaust system from JBA, which is high quality and gives a fairly quiet rumble. The exhaust fit’s nice and fill’s the bumper like it’s built to do so! I wish all parts were manufactured that way!
Paintjob
Now the front end is a complete different story. The CS6 front bumper facia, looks good, but doesn’t fit like it should be, the paint shop will have to spent at least a day to make this more acceptable, the curves and lines just don’t match where it meets the lower part of the front fender. The V6 grill which was used to accommodate the shelby grille after the foglights and middle section was removed fits good in the upper grille section, the mesh grille for the lower grille section however needs a little massage to fit as well. The hood was installed, and aligned so we could pre-drill the holes for the hoodpins, something you do not want to do after the paintjob. It took the bodyshop an extra 30 hours to make the front bumper facia fit correct and to prep the hood, but now it fits like an OEM bumper.
Well the car came back perfectly, so time to build the rest on the car at first we started with the brakes, the stock brakes were replaced by the shelby Baer brakes, although they are basicly an upgrade for the eye, they might provide slightly better stopping power with the 1 inch larger rotors wihc are slotted and drilled, and inside the 20×9 inch Shelby razor wheels they look great and fill ip the gap just fine. Because this is a non abs vehicle we had to make custome brake hoses.
The plastic Paxton intercooler tank kep leaking a bit no matter what we did so we’re welding our own from stainless steel and mount it on a better spot as well where it is not warmed up by the exhaust, but cooled from wind coming under the hood, and it will hold about 7x more fluid than the stock plastic can, pictures will follow next week.
On the 20 inch razors we mounted 275-35-20 Yokohama S drive shoes, and instead of the stock wheel sensors we installed a set of valvestem sensors, we do this because under high speed the stock hoselock type sensors brake every now and then. When they break they cause severe imbalance… The remainder is detailing like the new snakes on the fenders, shelby gascap decals, shelby doorsillplate decals, the CS6 turn2 dashplaque and installing the interior again. Before we can do the upper and lower grille, the trunk letters and side scoop we’ll have to wait another week for the paint to harden. After 10 days the striping and scoops were applied, although we followed the guidelines for the installation of the scoops, they came loose because the poor shape which resulted in a too high tension on the supplied 3M tape. We took them off, warmed them up again, applied some indusrtial double sided tape and some dabs of window sealer to achieve some extra adhesion.
Tuning and final adjustments.
After we installed the stock tune as provided in the kit we found out that it was running pretty lean under accelleration and wide open throttle, so some adjustments to the tune had to be made until the air fuel ratio was up to par. After the test drive we double checked the suspension and all parts installed.
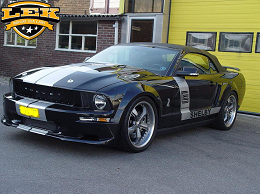
This is the end result, and I have to say that it looks stunning and the ride quality is very good.
See more pictures and updates during the conversion on our Facebook Page